Monday, December 29, 2014

Resolutions - Stash Ideas


Pinterest can be an addiction of sorts but now and then I come across some genius ideas. I recently searched fabric scraps. Wow! Here are some of the great ideas that I came across! 
Picture from Bunk's Blog


First - Storage. I keep my scraps in a large Zippered storage bag with handles. Larger scraps I keep in a plastic bin to use for pockets, collars, etc. 


Bunk's Blog did what so many do - create a family heirloom. A Quilt. I have a quilt that my grandmother made in the 1920's. It's a bit threadbare but it makes me think of her which makes me Smile. Anyway - Here's an example of Bunk's work! 


The first one I came across is from PeriwinklePincushion  

Each Scrap is folded and rolled up then tied with a small scrap! 


My next find was from MapleandMagnolia 
This giant jar of scraps! I love the label on the jar.What a great decoration for your sewing room! I have a large glass pickle jar stashed - Time to get it out of the closet and put it to use! 


Now what to do with those scraps? 
McCall 1078 - ClaireBearToo


First this great 1940's toy pattern by McCall. Each animal measures between  The finished size of the giraffe (B) is 10 inches. The finished sizes of the remaining animals are from 7.5 to 8 inches high. All you need to make these is some scrap cotton, embroidery floss, and yarn. Perfect for decorating a baby's room, favors at a baby shower and decorations too. The possibilities are endless. 


McCall's 2338 PatternMatters
Here's one that uses very little as well. The body is men's athletic socks! 
12.5 inch Mice & Clown. (does that clown look like it should be given to a small child?) 

Visit Vintage Pattern Collective for the best selection of Vintage Sewing Patterns! 


My favorite idea is this great fabric twine by MyPoppet   Even if you just leave them on the spools you have created some great art! 


Next - Rag Rugs! The Crafting Chicks have a great post on making rag rugs. I grew up on the East Coast of the U.S. where rag rugs were a household given. I have made small (dollhouse) ones but have never attempted a real one! 


Last but definitely not least! BurdaStyle Did a great post for Earth Day 2014 on using scraps! 
Great Ideas and so many options!  Camera Strap, CD Holder, Necktie, Needle Books, Fabric Flowers, Fabric boxes


Thursday, December 25, 2014

FREE PATTERN FRIDAY - KNIT BLOUSE


Courtesy of

This knit blouse, featured on the cover of Workbasket Magazine in April 1952, would be a great project to complete over a chilly weekend. A great spring top, as it is a timeless design. Create this Sweater as an easy weekend project.
For Instructions, CLICK HERE

Monday, December 22, 2014

Three Basic Pocket Types


Here are 3 types of pockets for you to either add to an existing garment or construct as you are making a new one. I for one love pockets.

Courtesy of Mary Beth


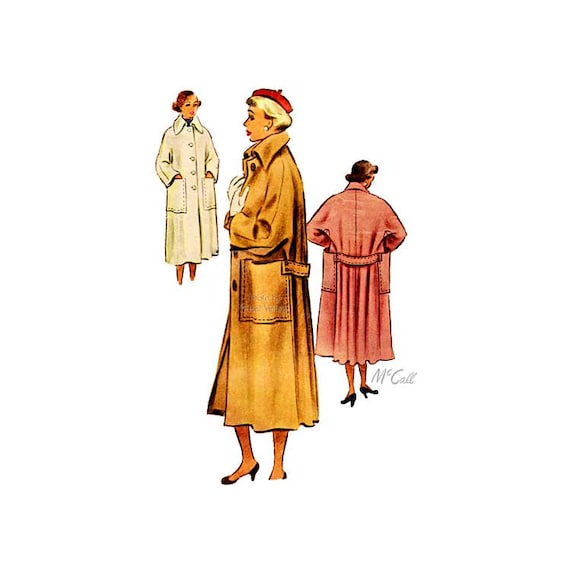
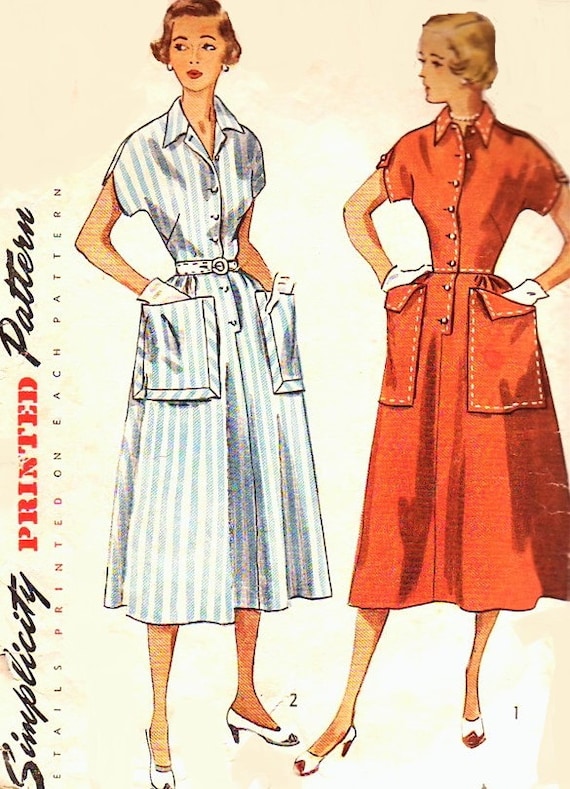
PATCH POCKET


First is the basic patch pocket. The most important thing to remember when creating a patch pocket is to make sure that all sides are even and true. As long as the measurements are accurate, the rest is easy!

Vintage 40s Misses Long Coat Sewing Pattern McCall 7775, Button Front, Wide Sleeves & Large Pockets Size 14 Bust 32, Swing Swagger Coat
McCall 7775 VirtualVintage


50s Large Pockets Dress Simplicity 3289 Vintage Sewing Pattern Kimono Sleeves Nice Tailored Details Bust 34 Pattern
Simplicity 3289 SoVintageonetsy


If the garment you are making doesn't have a pocket, you need to create a pattern for it. Use a piece of cardboard such as a cereal box. Measure your dimensions carefully and cut it out. Cut the cardboard keeping in mind that you need to have enough allowance to turn under. When creating rounded corners, cut several notches to allow fabric to lay flat when turned under. Press before attaching to garment. See figures 1-4 for details. 


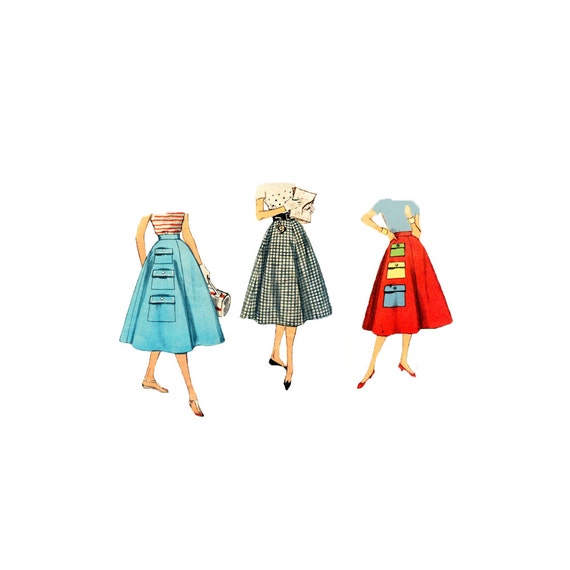
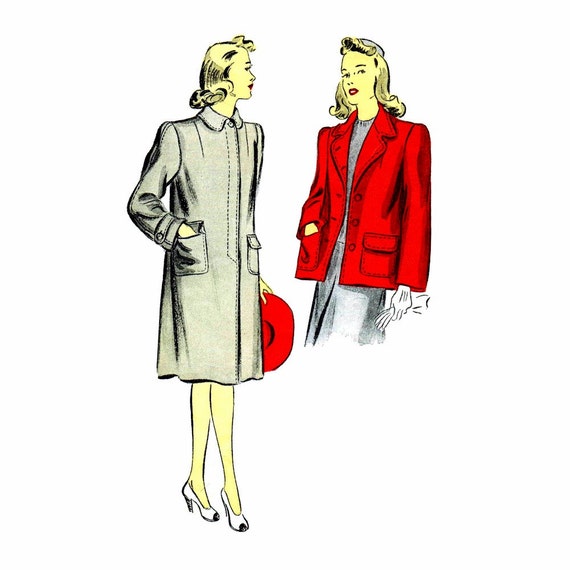
FLAP POCKET                     
You can easily add a flap to a patch pocket. Add the desired hem at the top of the pocket. Turn hem to the right side and stitch. (Fig. 5) Turn, baste, and press edges so that they are even. Hem by hand or by machine before stitching pocket to garment. Make sure that the placement of stitching on pocket and flap line up. (Fig. 6)              


BOUND POCKETS

When making bound pockets, the weight of the fabric matters. If the fabric is lightweight, the fabric can be used for both the binding and the lining. If heavyweight, use self fabric for binding and a lining fabric for the pocket. 

First mark the pocket opening on both the binding and the garment. Cut the binding at least 1 inch longer than the completed pocket and 3 to 4 inches wide. (Fig. 7). Be sure to match the grain of material of binding and garment or if the pocket is at an angle, the binding should be on                                                                                         the bias. 
Place binding on right side of material, matching where the cutting lines will fall. Pin and baste carefully. Stitch around the cutting line - the distance you stitch back from the cutting line depends on the effect desired when finished. One-Forth inch back from the cutting line gives an attractive piped effect. In heavier materials you need to stitch at least one-half inch from the cutting line. Make square corners at the ends by leaving the machine needle down in fabric, lift the presser foot and turn fabric making the same number of stitches across both ends (Fig. 7) 
Cut through center of cutting line to within one-quarter inch from each end. Now slash from center to each corner being careful to not snip the stitches. Pull the binding piece through to wrong side. Continue to pull until it forms two even rows with perfect square on other side. Stitch across each end to hold the binding together. (Fig.8)  Then stitch around buttonhole in the seam edge so it will be flat. 
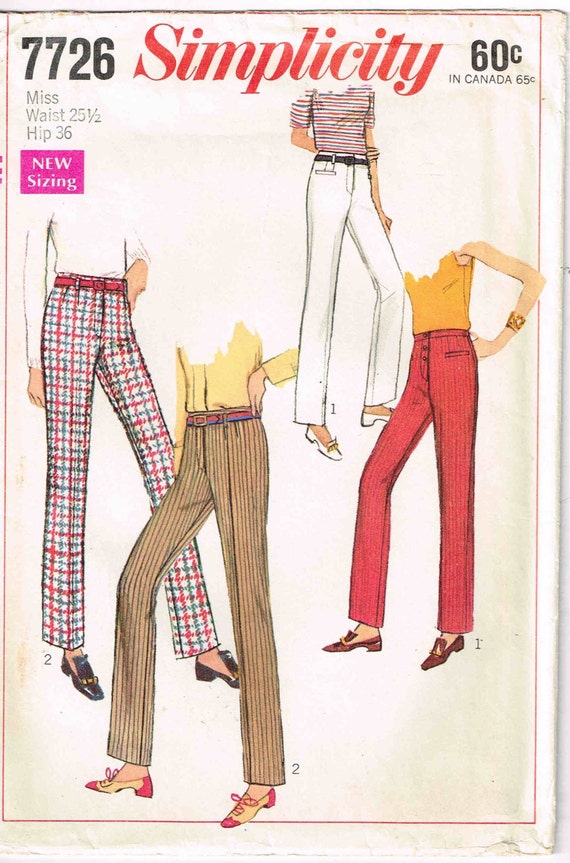
Misses Vintage Hip Hugger Below the Waist Straight Leg Cigarette Pants Vintage 1960s Simplicity 7726 Sewing Pattern Waist 25.5 Inch
Simplicity 7726 PeoplePackages
Join pocket on wrong side (Fig. 8)  If the binding piece is not large enough add an additional pocket piece, opening the seam and pressing flat. Stitch and overcast the seam. 


Which ever style you chose, take your time to make sure that your pocket placement is accurate. It can make or break a garment!

Thursday, December 18, 2014

FREE PATTERN FRIDAY - Cool Caftan


Courtesy of FriskyScissors


Taking a tropical vacation this winter? Make this great Caftan from - you guessed it, a sheet! 

Choose a great vintage sheet or a crisp new one (or do both) to make this vintage look Caftan with great details!

CLICK HERE FOR PATTERN

Tuesday, December 16, 2014

Focus On: Butterick Young Designers: Mary Quant

By Sherri, sewbettyanddot

When we think of designer sewing patterns, many of us probably immediately think of Vogue: Vogue began to publish named designer patterns around 1949. Stay tuned for more blog posts about Vogue designers! The other pattern companies also created designer pattern lines, and in this post we'll start with Butterick.

Butterick began its Young Designer series of patterns in 1964 in an effort to appeal to a more youthful seamstress, and Mary Quant was a natural choice to begin the series. Quant was born in England in 1934 and graduated from Goldsmith's College, London, with a degree in Art Education. She began her career in fashion as an apprentice to a milliner whose shop was located next to the venerable Claridge's Hotel. In 1955--at the age of 21--she opened a shop called Bazaar on the King's Road in the bohemian Chelsea neighborhood in London; a second branch followed in 1957. Mary Quant was in the forefront in making London, for the very first time, a fashion capital.

Her youthfulness meant that she identified closely with her customers. With the success of several garments she designed and made, she decided to focus on her own clothing line. Quant's idea was that women and girls without a big budget should still be able to look hip and chic, and she also believed that clothes should be simple and easy to move in. Her shops were the place to be: she was friends with Vidal Sassoon (she sported his iconic five-point bob) and the Beatles (Pattie Boyd married George Harrison in a Quant mini). According to the London Guardian, "Quant was responsible for hot pants, the Lolita look, the slip dress, PVC raincoats, smoky eyes and sleek bob haircuts...."

Left to right: Vidal Sassoon cutting Mary Quant's hair (courtesy classicenglishstyle.com);
The second branch of Bazaar, on Brompton Road (courtesy queensofvintage.com)
Pattie Boyd with the Rolling Stones (wearing a version of the dress in Butterick 3287!) (courtesy glamouragogo.blogspot.com)
A 1960s Mary Quant ad (courtesy glamouragogo.blogspot.com).

She is, of course, one of the designers often credited with "inventing" the miniskirt (along with French designer André Courrèges) in the early 1960s. She claimed that it was her customers who were responsible for the garment: they kept insisting that she make their skirts shorter and shorter and shorter. She has said, too, that she was influenced by ballet costumes, both in terms of short skirts/dresses AND the tights that went under them. Whether or not she invented it, Quant definitely popularized the miniskirt--and some sources say that she named it the Mini after her favorite car (she designed a special edition Mini car in 1988, complete with her signature daisy motif). In the late 1960s Mary Quant made hot pants ubiquitous and popular, as well as colored tights and color-blocked a-line dresses, and her make-up line was wildly successful (spider lashes, smoky eyeshadow, and pale lips were all part of the Quant look). The two models who are most associated with Mary Quant are Jean Shrimpton and of course, Twiggy!

Top row: models wearing Mary Quant designs (courtesy u1010026.wordpress.com)
Twiggy wearing a Quant design (courtesy strawberrylemonade.blogspot.com)
Bottom row: A Mary Quant Daisy doll (courtesy Wikipedia)
Mary Quant with images of Royal Mail stamps featuring her and the Mini automobile, ca. 2009 (courtesy excoboard.com)

Quant sold/licensed her designs to J. C. Penney in the early 1960s, allowing her clothes to be mass produced and introduced to the American market. She designed tights, make-up, and accessories as well, and there was even a Mary Quant Daisy fashion doll. In 1966 she was made an Officer of the Most Excellent Order of the British Empire (OBE) and received the honor from Queen Elizabeth wearing a blue jersey miniskirt. Mary Quant is now 80 years old.

Top row: Mary Quant receiving her OBE award at Buckingham Palace in 1966
Quant fashions in J.C. Penney catalogue
Middle row: J.C. Penney catalogue
Mary Quant makeup advertisement
Tights by Mary Quant
Bottom row: An ad for Quant dresses
Fashions for Mary Quant's Daisy doll
A toaster designed by Mary Quant
(all image courtesy tumblr.com)

Given all of the above, I'd say that Butterick definitely had their finger on the pulse of youthful fashion when they chose Mary Quant as their first Young Designer!

Now let's look at some Butterick Mary Quant patterns from members of the Pattern Patter team!

Top row: Butterick 3505: Fragolina


(Text sources: Wikipedia; vam.ac.uk.com; biography.com; dailymail.co.uk)

Which Mary Quant pattern makes gets your motor revving? Tell us in the comments!

Thursday, December 11, 2014

FREE PATTERN FRIDAY - Toy Elephant

TOY ELEPHANT


Courtesy of RetroMonkeys

I love this elephant! Make a fuzzy, cuddly one for the littlest member of your family! Use buttons for the eyes for the over three crowd or embroider them for the under three's. Either way, he is adorable! Choose one or two of their favorite colors. 
Originally published by Workbasket Magazine,
 December 1955.


Download your copy HERE

Monday, December 8, 2014

Sewing for the Holidays


Don't Forget Your Littlest Angel

Sew Her a Holiday Dress, Quick Ideas That She Will Love or Pajamas for all of them!

In the hectic month leading up to Winter Holidays, we tend to forget the most important people in our lives. We rush around buying this and that, writing cards to people that we don't even really know, and planning parties and meals. The people that make the season so magical are right under our noses - and underfoot too. What would make her feel more special than having a holiday dress made especially for her. Nothing too fussy or time consuming. A dress that goes from playing with toys under the tree to dinner at Grandma's house. Alternatively, how about some new pajamas for the boys and girls in your life? Those holiday photos of the kids in their new PJ's will be cherished for years to come. 

McCalls 4170 ViennasGrace


Butterick 4747 ViennasGrace


Simplicity 7890 Patternshop


Simplicity 2040 Pattern


Butterick 8247 AllThePreciousThings


Simplicity 9144 AllThePreciousThings


Thursday, December 4, 2014

FREE PATTERN FRIDAY - Woven Ribbon Carriage Blanket


WOVEN RIBBON CARRIAGE BLANKET

Courtesy of RetroMonkeys
Workbasket Magazine December 1951

Two colors, similar or contrasting, woven for the face of this pretty blanket meant to be used in the carriage. Bound on the edges and lined with cozy flannel. I might just make one myself! 

Click HERE for Pattern! 


Monday, December 1, 2014

Teaching Tools - The History of Teaching Children to Sew

Bridal Party Sewing Kit 


School Sewing Lessons
In days gone by, young girls carried a composition book, like the one pictured below,to and from school. What's different from the books carried today? The subject of the lesson. This book is full of lessons on sewing. Each lesson has a page of instruction and then a piece of fabric on the facing page practicing the stitches. The work is so amazingly neat and tidy. I wonder as I look at it when it was done, how old the girl was, where did she live. 

Growing up in the 1960's and 1970's, my mother started teaching me how to sew and iron when I was 4 years old. Then as a pre-teen, Home Economics was a required class for 7th and 8th grade girls. The boys took wood shop class. I continued to take Home Ec through my Junior year in High School by choice. In past generations, sewing was a required class for female students of all ages. Girls had lessons ranging from mastering different stitches to complex garment construction and pattern making and fitting . The composition book full of lessons and fabric with a different type of stitch for each of the lessons was a great Estate Sale Find.  Model No. 1 starts with the basic basting and hemming stitches. 


You can see the student's stitches in the picture above. 

Model No. 2 is a running stitch. Girls took their studies very seriously. As you can see from the sample below, the girls did their very best to do a good job.  
                                                                    

The book continues through all different stitches and finally into decorative stitching methods. Something I know we never learned! 


Sewing Mannequins 


Besides the lessons in school, during the 1940's and 1950's, sewing dolls, or Mannequins, emerged as a way to encourage young girls to sew. During WWII, there were shortages of fabrics. Women were encouraged to remake clothing using worn or outgrown garments instead of buying yardage. Because the mannequins were small and used scraps they were the perfect way for girls to learn. This kit included templates to make the simplest shifts and pullover blouses. This kit was obviously intended for a young girl. Probably 6 to 8 years old.


Older girls had sewing dolls as well. The dolls had more mature bodies and more complex patterns as well. The pattern companies came out with dolls. McCall had Peggy McCall. She was available as a stand alone as well as a deluxe kit that included patterns and a Dress Form made of plaster. 


My Estate Sale Peggy Mannekin with patterns and dressform.


Peggy McCall was one of the more popular Mannequins. Unfortunately, the available materials were not very durable. As you can see in the above picture, my Peggy is missing an arm and the other arm has no hand. I've always taken in the runt of the litter or the toy that nobody wanted. The patterns for Peggy and similar dolls were not just a simple template. They are miniature versions of actual patterns. 
Photo Courtesy of SewBettyanDot


Here's the Simplicity version of the Mannequin. The cover shows the FashionDol with a dress and the box with the dress-form on a stand.


Available at Amazon.com for $17.99  for 7-12 year olds


The Resurgence of the Art of Sewing

Sewing Today


Today the craft of sewing is being reintroduced to children. A much more practical mannequin than the fragile versions of the past, this kit is being sold on umcommongoods.com for children 8 and up. Alex Toys is selling this sewing kit that includes everything you need to make items.


Seedling Fashion Design Sewing Kit - uncommongoods.com $50


Sewing Cards Beginner Books


Now I need to back up to the younger set. Sewing cards were popular when I was growing up. Lacing yarn through holes in the cards that outlined the picture was a good starting point. It also helped develop some fine motor skills and had/eye coordination. These cards are still available on many websites in the toy department under crafts. The vintage ones have very cool graphics but I don't recommend giving the vintage ones to children as the ink used in older books and paper goods do not meet modern safety standards.
From BlueJeanJulie on Etsy


 Sherri from SewBettyandDot sent me some great pictures of some of her sewing books for children. Here's one for beginners.


This book by McCall has such nice detailed instruction on stitching. It also has great projects for kids to make. Not just sewing!


My siblings and I made everything from candles, to needlepoint pillows, to birdhouses as kids. Rainy and snowy days were always busy ones either in dad's workshop in the basement, in the kitchen, or simply sitting on the sofa with a needle and thread.
I don't recall having any books to help me learn - I would have loved that!


If you want to teach a child to sew, start with sewing cards. You can buy vintage ones or make your own. (see picture at right). Once they master the sewing cards, move on to simple stitches. Don't rush. Teach them to enjoy the experience and appreciate the craft.


Easy Steps in Sewing for Big and Little Girls - or - Mary Frances Among the Thimble People

by Jane Eayre Fryer


This is another great book to have the younger set use. 
The book has a story with the Thimble People being the characters.What a great way to teach kids. The story takes them through the steps of sewing. I found a blog with a write up on the book, HERE
I also have the chapter on children and sewing as a PDF file that is part of the Gutenberg Project. You can view or download it HERE.


One of Many New Sewing Books for Kids


Television shows like Project Runway have brought the art of sewing back to the forefront. New books are being published, community centers are offering easy sewing projects aimed at kids. Pattern companies have created new lines aimed more at teens and young adults. "Toy" sewing machines are becoming more available as well.
Totally Me! Sewing Machine with 4 Projects


The toy machines range from true pretend toys to working models such as the one pictured that are working machines with all of the supplies as well as projects. For $30 or so, a child can give it a try. These days $30 is a pretty affordable gift! For older girls, you may want to invest in a "real" machine. In looking at machines on amazon, there are some for under $60 that have fairly good reviews. Take is another step for more choices in stitches and the choices are endless. Starting at $60 and going as high as $5,000. Be careful, you might talk yourself into buying a new one for yourself! 


Here are a couple of options for low to mid priced machines. 
Brother Project Runway $369 on Amazon.com
      
Brother XL2600l $79.99 on Amazon