Showing posts with label how-to. Show all posts

Thursday, February 11, 2021

Adding To The Wiki Tutorial 2021


Tutorial 3

Hello!

Booooy has it been a while!  A lot has changed everywhere!  Are you doing more sewing at home?  I hope so!  

Would you like to add listings to the Vintage Patterns Wiki?  A lot has changed there, too!  My previous tutorials are less than helpful these days.  So I thought I would write you a new one!

Here's my previous ones:  (Note:  They are not entirely accurate now but may still be useful)


While adding links is more or less the same (I'll go over what's changed), adding patterns is a LOT different.  It's become more labor intensive, but it is really NOT very much more complicated.  This is going to be a LONG tutorial, but I'm sure you can get something out of it.

First things first:  This is written for people using the CHROME browser in WINDOWS on a PC.  I don't know if it will work the same in every other browser, or with other operating systems.  I do not recommend using a phone or a tablet to do this.  I recommend you use a PC.  

I DON'T RECOMMEND THIS FOR COMPLETE COMPUTER BEGINNERS.  If this looks too scary for you, well, I still believe you can do it, but maybe practice a little first. :)  If you have used and made edits to the Wiki before, you can probably do this no problem.

The first step is to make sure the pattern you want to add isn't already in the wiki.  If it is, well, you don't need to add it!   Let's go over again how to do that.


First, load the Wiki.  After the part that says "wiki" in the address bar, type in your pattern name.  The format is  "Brand Name Underscore Pattern Number"  If that pattern exists in the Wiki, it'll load that page.


In some cases, that won't be the pattern you're looking for... in that case add "underscore A," "underscore B," etc., until you find the one you're looking for.  If you don't find the one you're looking for, you have to add it!  In this case, I'm looking for a 1920s Butterick pattern.  When you're ready to add, click "create this page."


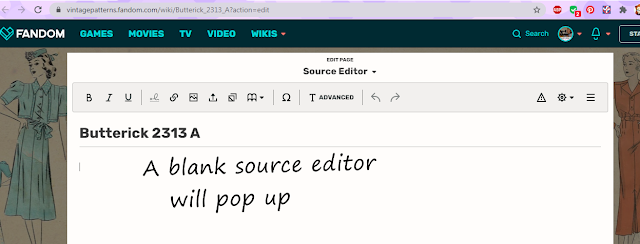
A blank source editor will pop up.

MEANWHILE, in another tab, open a pattern wiki page that already exists.  It doesn't matter what it's called or what page it is, just so long as the formatting is correct.  We're going to use this to transfer the format over to our listing.  DON'T CLOSE THE TAB of the page you're creating.

Again, we're just going to use a previously-published pattern to use the formatting for a new listing.  So, it doesn't matter which listing it is... we just need the formatting since the old way of using a template is gone.  We're basically making our own template.


On this page, click the purple arrow on the right.  Click "EDIT SOURCE"


Edit source is here!


When you open that page, RIGHT CLICK anywhere where the text is.  Then click "SELECT ALL."

Like this.


Now, while everything is highlighted, right click again and select "COPY."  (Note:  You can also type "Ctl+C.")


This is very VERY important.  HIT CANCEL.  DO NOT SAVE.  HIT CANCEL.

Now, switch back over to the "create listing" tab you started earlier.  You're going to paste in the information from the listing you just copied.


In the blank listing you have started, right click, and click "PASTE." 
(Note:  You can also type "Ctl-V.")  This will paste in that information from the other listing.


Now, you have to remove what you don't need.  You want to keep the formatting, but get rid of all the information about the other pattern.  Keep headings and stuff that is the same in every listing.  Delete everything else.  Delete other vendors, links to blogs, etc.  But MAKE SURE you keep those category headings.


For example


Delete this stuff.  We'll add categories back later.  (Again, DON'T delete headings and important stuff.)


Next, the first thing you want to do is add your picture.  Assuming you have taken a picture or scanned one in of the pattern you want to add.  Put your cursor in the spot indicated in the picture, and click the little button that looks like a picture.


When you click, a pop-up occurs.  Don't freak out!


The pop up will ask you if you want to use a picture that's already been uploaded.  This is pretty annoying, since you probably don't want to do that!  Ignore those pictures and click "Upload."  

(Note:  If your pattern already exists (which you should have already checked,) the picture might be there.  Make SURE the pattern isn't already in the Wiki.


Another box will pop up.  Agree to the terms by clicking on the box, and then click "Select File."  Pick the picture of the pattern you want to add.  Or, you can drag it to the grey box, either way.


After you do that, ANOTHER screen will pop up.  Put in a brief description... (it can be as simple as the name of the pattern,) and then click "SAVE."

Now, yet another window will pop up.  It should show the image you just uploaded.  Click "USE THIS IMAGE."


Yet another annoying window will pop up.  Just ignore it and click "Insert."

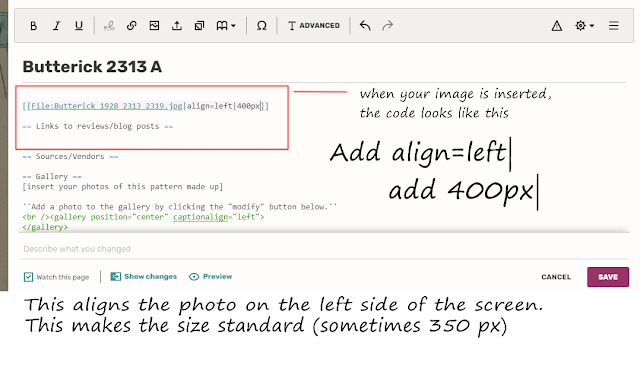
Now the image is inserted as Wikitext code.  You need to edit it a little bit.  You need to make sure you add "|align=left|"  and "|400px"  You might want to make it 350 px if your image is especially large.  

This tells the code where to put the image (on the left side of the page) and how big it should be (400 pixels.)  If you don't do this, the default is all wrong and will mess up the listing.


Now you want to add your pattern's description.  One space under the picture code, but above "links to reviews/blog posts," write the description of your pattern.

The usual format is "name of pattern (semicolon) ca. date of pattern (semicolon) title of pattern (period) pattern description."

If you're confused, just look at other listings or the picture above about how writing the description works.


Next, scroll down to the "add categories" section.  It goes one space under the "wishlist" part.  (I usually add my shop link later, more about that in a bit.)

The format is "(two left brackets) Category (colon) Name of category (two right brackets)"

Look at the picture above.  When you start to type a category, it should pop up and you can just click it and it'll finish the category entry for you.  Add as many categories as you want.  You can always add more after you publish the listing.  (*Or Tarna will often add more for you.)


When you've added all the categories you want, your listing is more or less done!  We want to check it to make sure nothing looks wrong.  Click "preview" and you can make sure it looks ok before you publish it.  If you just want to give up (I hope you don't!) click "Cancel."


It'll pop up a window of the way your entry looks.  If it looks good, great!  You can click "Save Changes."  If something looks wrong, click "Resume Editing" and you can fix it.

Then your listing is officially published!  YOU DID IT!

--------------------------------------------------------------------------------------

NOW.  I bet you're wondering how to add your shop to the listing.  This part is easy.  You can do it on a listing you made, or any listing in the Wiki that's already there.

This is MUCH easier.

Click on "Edit Source" next to "Sources/Vendors."


If there's other shops already listed, make sure you put yours last.

The format is listed above. "*[[Your shop link your shop name]]"


You can preview to make sure it looks okay, or click "save."

And that's it!

=======================================================================

I hope you found this helpful.  If you have any questions, please feel free to drop them in the comments.  Please visit all the Pattern Patter Team shops by searching "PPTP" or "Pattern Patter Team" on Etsy.

Wednesday, June 24, 2015

Pattern Cleaning & Repair, Part 2


Part 2 - Archival Repair Methods
(For Part 1, which covers paper cleaning, please click here.)

Oh dear!  What do you do when that perfect, rare pattern you just found has a big, horrible tear?

Is all hope lost?  I'm here to tell you that hope is NOT lost, and many patterns can be repaired to nearly as good as new.  (Even really ratty ones!)

What should you use?

I recommend Filmoplast P professional archival tape.

This pattern can be repaired!!

**Please practice on junk patterns first and get the hang of it before you go sticking tape on that $200 pattern! **

Okay, now that I've got that out of the way... moving on!

This tape is amazing!  It won't ever turn brittle, turn yellow, crack, or become hard.  You can even IRON it (on a lower setting) if you use it to repair a torn pattern piece.  It is really a miracle product and I would never, EVER use anything else!  Also, please, NEVER EVER use regular Scotch Tape, it will RUIN YOUR PATTERN.  I cannot stress that enough!!

Let me show you a little about how to repair patterns the archival way!

First, there are a couple of products besides the Filmoplast P that you should have on hand.  I recommend keeping a variety of sizes and shapes of tweezers around for putting small pieces of paper back in place.  

Bone Folder and tweezers shown on the right.

I also recommend something called a BONE FOLDER which will help you to rub the tape and stick it down really well, as well as crease or uncrease things with more precision than you can with your fingers.  It is basically like a little stick with a round end and a pointy end.  While you can use any old plastic or metal pointy thing (such as your favorite point-turner), I strongly suggest you use a folder made of bone or Teflon as it is less likely to stretch or damage delicate paper fibers.

Plus, the folder also makes a great point-turner for sewing! :)  I keep one in my craft box and one in my sewing box, too.  You'll find more uses for them than you can imagine.  They're inexpensive and very handy.

OH, and make sure your HANDS ARE CLEAN.  Fingerprints can show up on the tape or the tape can pull the dirt off your hands, and the last thing you want is dirty fingerprints on your new repaired pattern. 

Adjust difficult tears with a good pair of tweezers, keep several kinds on hand.

When working on old paper, try to repair on the back if at all possible.  Sometimes, it's impossible and you must put tape on the front of an envelope.  But if you can, keep your repairs to the back side.  
First, carefully examine the tear and see if you can tell which parts of the paper need to be "on top" and which parts need to be on the bottom.  Place them back as well as you can, and use tweezers, toothpicks, or even straight pins to get stuff going the right way if necessary.  How precise you are is up to you, we aren't repairing the Constitution of The United States here, it's not an exact science. So, in my opinion anyway, a good repair is better than no repair at all when it comes to these vintage patterns.

Rub the tape with the bone folder to help it show less, and also to adhere the tape to the paper better.

After you have everything lined up the best you can, place the Filmoplast, and "burnish" with your bone folder.  Sometimes the tape will almost entirely disappear!  Sometimes, it will still show.  It depends on the type of paper.  Shiny pattern envelopes are much more difficult to repair than matte ones.  Pattern tissue accepts Filmoplast very well and it almost always disappears completely and then I can't tell where I even made the repair!


Welp, that's unfortunate. :(

This unfortunate pattern envelope was torn when I was getting it out of the drawer.  Let's repair it together!

Tape the smaller tears first and move onto the big ones later.  You can tear or cut  Filmoplast to any size you want.
First, I repaired the small tears in the detatched piece.  Like I said above, tape on the back if you possibly can.  After that was all repaired, I moved on to the next part.


Always tape on the back unless you really have no other option.

Then, I put tape on the back facing up.  This part can be a little tricky.  You can do it in sections which is usually a little easier.  I did it this way to have more clarity in showing you how it works.

Better already!

CAREFULLY line up the pieces and stick down!  Rub with your bone folder, and your pattern is repaired!

Much better!

How about that?  Almost as good as new!

A few more notes..

Envelope with Split Side or Top: if you have an envelope with a split side, you can just fold the Filmoplast about in half around the edge of the envelope, and burnish well with the bone folder.  Sometimes it shows, and sometimes it doesn't, but either way it's better than having pieces falling out of the envelope.  I can add pictures of this process if anyone would find it helpful.

Envelope with Unglued Side: If you have an envelope that has come unglued, I generally just repair it with an acid-free glue stick that is marked as being photo safe or archival.  You can get those at your favorite craft store.

I recommend Gaylord Archival and Hollinger Metal Edge for purchasing your archival repair supplies.

Just a note:  I have used other, cheaper brands of archival repair tape and have found it unsatisfactory.  I can only comfortably recommend FILMOPLAST.  Filmoplast P is not cheap, but it goes a very long way (there is a lot in a package), and is the best product on the market, in my novice opinion.  

Stay tuned for Part 3, where I'll give a few tips about getting yucky smells out of old patterns.

If you have any questions, please leave them in the comments, and I'll try to help you the best I can. :)

Also, be sure to visit all the wonderful shops of the Pattern Patter Team!


Wednesday, June 17, 2015

Pattern Cleaning & Repair, Part 1


Part 1 - Archival Cleaning Methods

One thing is for certain, all of us who collect, sew with, or sell vintage patterns... we all come across a lot of sewing patterns in really crummy condition.  Dirty, torn, smashed into envelopes... it's all part of the deal when you get into vintage sewing. 

Many times, you'd be tempted to give up on that poor-condition pattern, but don't lose hope!  Many patterns can be repaired and restored to nearly as good as new... you just have to know what products and procedures to use.

This can be an expensive process, but when you are giving life to a treasure, you'll find it's worth it.

So, today I present Part One of a series on pattern cleaning, restoration, and preservation.

A collection of archival supplies.
You should make a nice, clean area to do your pattern cleaning and repair.  A table with a cutting mat is my preference, but you could use almost any flat surface, just make sure it's clean.

Probably one of the most common things you find on patterns is writing.  If the writing is in pencil, you can use a good 'ol Magic Rub Eraser.  These are gentle on paper if you don't rub too hard, and should remove pencil cleanly with no problems.  Be sure to brush away the eraser crumbs with a nice big drafting brush or clean, soft, paintbrush.

A simple product, but so helpful, it's worthy of framing!
Many times however, you need more than just an eraser.  Sometimes, those patterns are really dirty.  What then can be done?  That's when you bring out the big guns. 

Magic in a jar, trust me.

First on the list is Absorene paper cleaner.  This wonderful product has been around for over 100 years!  Maybe some of you will remember it from cleaning wallpaper, maybe in your childhood?  It smells a lot like Play-Doh and is pretty and pink.  It's also one of the most economical and safe ways to clean a vintage pattern!

You can just ball it up and rub it right on the pattern.

This pattern may not look very dirty, but just grab a healthy hunk of that Absorene and see what happens.  Be sure to rub in -one direction- if you can.


Look at all that dirt!  This is totally non-abrasive and will not rub through or damage the paper.  What it WILL do is take off dirt that maybe you can't even see.  It will really brighten up a dingy envelope. 

 Again, brush away any crumbs with a soft brush of some type.  You can re-knead the crumbs back into the Absorene too, but it will eventually decrease in size with use.  A little jar of it goes a LONG way too.  It will also help absorb smoke and other musty odors.  (Though kitty litter works better.. but that's another article.)

Sometimes though, patterns are EVEN DIRTIER.  For those really dirty patterns, I recommend a product called Groom Stick... the official paper cleaner of HER MAJESTY THE QUEEN.

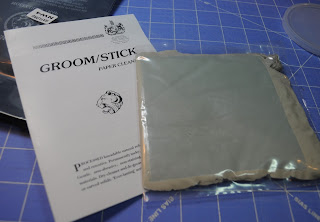
Groom Stick Packaging.

If you have a pattern with visible dirt or grime, Groom Stick is the way to go.  This stuff is amazing!  It is also useful for getting dirt and oils off your hands before working with delicate items.

Groom Stick out of the package.

To use it, break off a small piece and knead it with your hands.  (There are more detailed instructions with the actual product.)  Roll it into a ball or cigar shape and gently rub on the paper.

Groom Stick on a skewer.

You can also put some on a skewer or chopstick for more delicate touch.  It's totally non-abrasive, and can be re-used almost indefinitely.  Just keep kneading the dirt back into the groom stick!  Use it until it gets too dirty or sticky to continue to be gentle on your paper.

I don't have any examples right now of using it on a pattern, because at the moment I didn't have any patterns dirty enough to use it on!  (Lucky me?)  But trust me, if you see visible dirt or grime, this stuff is a MIRACLE WORKER.  It is gentle on the most fragile of paper, and if you work a lot with historic paper, I really can't recommend it enough.

So, where do you purchase these wonderful products?  Personally I suggest two different websites:

Gaylord Archival Supplies

Hollinger Metal Edge

You might be able to get them on other websites as well.  The sites above can assist you with many paper-cleaning issues.

Well, that's all for now!  If you have any questions, please leave them in the comments and I'll try to help the best I can.

Stay tuned for Part 2 where I'll give some tips on repairing torn patterns the archival way!

Also, be sure to visit all the wonderful shops of the Pattern Patter Team!